An In-Depth Explanation of Vue 3 Lifecycle Methods
Familiarize yourself with Vue 3 component lifecycle methods for increased app productivity, problem resolution, and parent-child component relations
If you want to be a pro at developing and managing Vue.js applications, it's super important to get a good grasp on Vue.js lifecycles.
Just like many other cool JavaScript frameworks, Vue.js uses a component-based architecture and offers a bunch of lifecycle hooks. These hooks let you run code at specific moments in a component's life.
With Vue.js lifecycles, you can decide when and how certain logic runs in your components. This comes in handy when you need to do things like fetching data, initializing stuff, or cleaning up at particular points in a component's life.
By knowing when components are created, updated, and destroyed, you can make your app run like a champ! You'll be able to dodge unnecessary work or resource usage during the component lifecycle.
Getting the hang of lifecycles will also help you spot and fix any issues in your Vue.js app. In addition, when you're dealing with parent-child component relationships, being aware of when lifecycle hooks are called in each component will help you handle interactions and data flow like a boss.
Key Takeaways
Vue.js is all about that component-based architecture, and it's got some nifty lifecycle hooks for you to run code at just the right time in a component's life.
By getting a handle on lifecycles, you can make your app run smoother and avoid any extra work or resource usage during the component lifecycle.
Plus, lifecycle methods or hooks are super important for managing those parent-child component relationships, helping you handle interactions and data flow like a pro.
Vue 3 organizes the component lifecycle into stages, each with its own specific hooks, so you can have even more control over how your components behave.
Understanding Vue 3 Lifecycle Methods
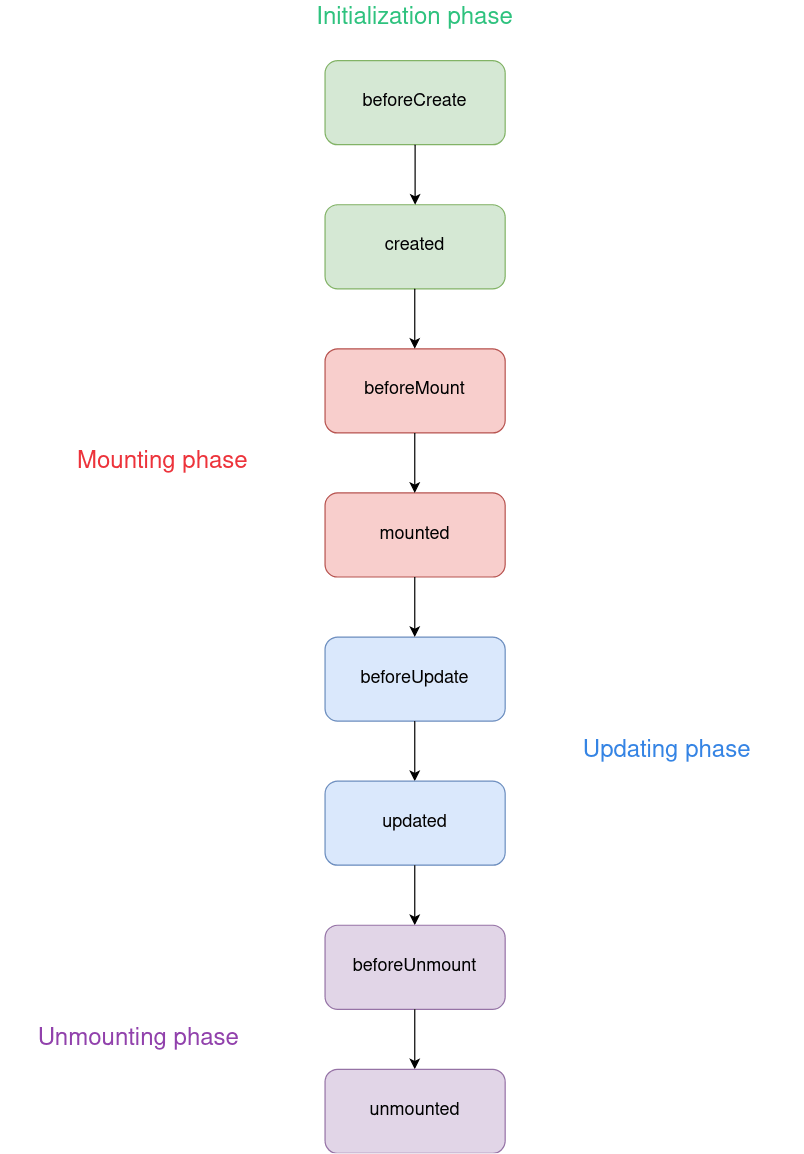
In Vue 3, the component lifecycle is neatly organized into different stages, each linked to particular hooks. These hooks let you, as a developer, run your own code at various moments throughout the component's lifecycle.
To get a good grasp of how these stages function and how to make the most of them, let's take a closer look at each stage and the hooks that go along with them.
Creation Stage
beforeCreate
The beforeCreate hook kicks in right before the Vue instance is fully set up. It's a great time to do things like setting up initial data or configuring important settings.
created
When the Vue instance is being created, a friendly little hook pops in just at the right moment, giving you a handy chance to take care of some important tasks before everything gets going.
You might want to grab some essential data from APIs, set up watchers to keep an eye on data or state changes, or even put together event listeners to react to user interactions or other happenings.
Mounting Stage
beforeMount
As the component is just about to join the DOM party, the 'beforeMount' lifecycle hook kicks in. This is the perfect time for you, the developer, to make any last-minute tweaks or polish the component's structure or data.
By making the most of this hook, you can be sure that everything is in place before the component becomes part of the DOM, making the mounting process a breeze and boosting your app's performance.
mounted
Once the component is happily mounted to the DOM, the mounted hook springs into action. This handy hook is often used for various tasks, like tweaking the DOM elements, chatting with external data sources, or even getting third-party libraries up and running.
By making the most of the mounted hook, developers can make sure the component is fully integrated and ready for some fun interactions before diving into any operations that might affect its performance.
Updating Stage
beforeUpdate
When a change in the component's data kicks off a fresh rendering, the beforeUpdate lifecycle hook steps in right before the update happens.
This hook is super handy for doing various tasks, like tweaking data before the update or checking out the component's previous state for comparison.
By making good use of the beforeUpdate hook, developers can make sure any needed changes or calculations are done quickly, keeping the component's performance top-notch and smoothly working with other DOM elements, external data sources, or third-party libraries.
updated
When a component finishes re-rendering due to some changes in the data, the 'updated' lifecycle hook comes into play. This handy hook is often used for all sorts of tasks, like tweaking the DOM based on the fresh data.
So, the updated hook is super important for tasks like DOM manipulation, which relies on the updated data, and it helps keep the whole app running smoothly.
Unmounting Stage
beforeUnmount
The beforeUnmount lifecycle hook pops up just before the component is unmounted and then taken apart.
This hook is super helpful in doing cleanup tasks that make sure our app stays stable and speedy. Tasks like taking away event listeners to avoid memory leaks, saying goodbye to connections with outside resources, or giving back any resources the component borrowed during its life.
Thanks to the beforeUnmount hook, our app can keep running smoothly and happily!
unmounted
When the component is successfully taken apart and removed from the app, the unmounted hook marks the end of its journey.
This super important step lets us carry out cleanup tasks, making sure our app stays stable and zippy.
Note: If you're curious about the differences between created and mounted hooks in Vue, feel free to check out my easy-to-understand guide on created vs. mounted.
Additional Hooks
In the wonderful world of Vue 3, life gets a whole lot easier with a bunch of extra hooks that cater to your specific needs, making app development a breeze.
errorCaptured
This little gem plays a big part in making error management a piece of cake within your app. It catches errors from any child component, making handling and managing errors simpler and helping your app become more sturdy and dependable.
renderTracked
This hook comes into play when a component is being watched for reactivity. It gives you a sneak peek into the reactivity dependencies of the component, so you can better understand and boost your app's performance.
renderTriggered
The renderTriggered hook is super handy for giving you precise control over the rendering process. It springs into action when a component gets re-rendered due to changes in its reactive dependencies.
Vue 3 Lifecycle Hooks Diagram

Leveraging Vue 3 Lifecycle Hooks in Options API
Given the context of understanding and boosting your app's performance, let's dive into a fun and easy-to-follow guide on how to make the most of Vue 3's lifecycle hooks within the Options API.
Fetching Data When Your Component is Born
A super useful way to use Vue 3's lifecycle hooks is to grab data from an API when the component first comes to life. This makes sure your component has all the info it needs to show or play with as soon as it pops up on the screen.
To make this happen, you can use the created lifecycle hook within the Options API. The created hook comes into play when the component instance is born, but before it's attached to the DOM. This makes it the perfect spot to fetch data from an API, as it lets you kick off the data-fetching process early in the component's life.
export default {
  data() {
    return {
      users: [],
    };
  },
  created() {
    fetch('https://api.example.com/users')
      .then((response) => response.json())
      .then((data) => {
        this.users = data;
      });
  },
};
Leveraging Vue 3 Lifecycle Hooks in Composition API
In this part, we'll dive into a hands-on example that demonstrates how to make the most of Vue 3's lifecycle hooks with the Composition API, so you can manage different aspects of your app like a pro.
Event Listeners: Let's Add and Remove Them
When dealing with event listeners, it's super important to add and remove them correctly. This helps avoid memory leaks and keeps your app running smoothly.
For Vue 3 and the Composition API, you can do this by using the right lifecycle hooks. So, let's get started!
import { ref, onMounted, onBeforeUnmount } from 'vue';

export default {
  setup() {
    // Integration of onMounted to add an event listener
    onMounted(() => {
      window.addEventListener('resize', eventCallbackFn);
    });

    // Integration of onBeforeUnmount to remove the event listener
    onBeforeUnmount(() => {
      window.removeEventListener('resize', eventCallbackFn);
    });
  },
};
Vue 3 Lifecycle Best Practices
Let's dive into some handy tips for making the most of Vue 3's lifecycle hooks, shall we?
Keep It Simple
When using lifecycle hooks, remember to keep them focused on their main job and avoid any extra stuff. If you need to do something more complex, think about using methods or computed properties instead.
This way, your code stays neat, easy to read, and bug-free.
Get Set Up in `created`
The created hook is the perfect spot to set up your component's initial data and grab any info you need from APIs. Doing this here means everything will be ready when it's time to start rendering.
Time to Tinker in `mounted`
Once your component is all mounted and part of the DOM, you can go ahead and play with the DOM elements in the mounted hook. This is the right moment to do any DOM manipulation you need.
Tidy Up in`beforeUnmount`
Don't forget to clean up after yourself.
Use the beforeUnmount hook to remove event listeners, cancel timers, and take care of any other resources. This helps you avoid pesky memory leaks and keeps your app running smoothly.
Conclusion
In this friendly chat, we talked about how crucial it is to grasp Vue.js lifecycles for creating top-notch and well-organized apps.
We took a fun journey through the different stages and hooks tied to Vue 3 lifecycles, like the creation, mounting, updating, and unmounting phases.
Plus, we dived into hands-on examples of using lifecycle hooks with both Options API and Composition API and shared some awesome tips to make the most of these hooks for your app's performance.

